The terminology used in this article is most likely a subject to change
Cubemaps
As it was shown in the previous example (please see it first in case you've skipped it), CubiOS operating system provides the way of knowing module number and screen indices that belong to a particular face of a cube.
This allows us to make the next step and move forward from putting of a picture on just one face to rendering of a panoramic cubemap on all faces at once. This would be a good excercise that helps to understand a little better how WOWCube topology works, and the result looks cool too.
But what is a cubemap?
In computer graphics,
cube mappingis a method of environment mapping that uses the six faces of a cube as the map shape. The environment is projected onto the sides of a cube and stored as six square textures, or unfolded into six regions of a single texture. The cubemap is generated by first rendering the scene six times from a viewpoint, with the views defined by a 90 degree view frustum representing each cube face
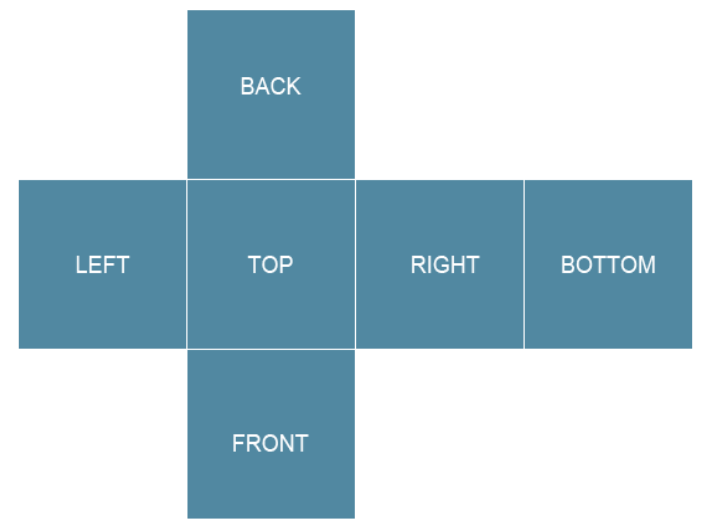
So in other words, a cubemap is just an image that holds six squares form the faces of an imaginary cube that surrounds an object; each face represents the view along the directions of the world axes (up, down, left, right, forward and back). It sometimes may be also refered as a cube net image.
Traditionally, face images included in cubemap are laid out in the shape of a cross, either horizontal or vertical. But the actual location of particular cube faces on that cross may vary - ther is no common standard for this, thus the same cubemap may look different while used in different rendering engines.
WOWCube topology API defines face positions the following way:
Face indexes are defined by TOPOLOGY_orientation values (see previous example).
Each face contains four uniquely indexed screens.

So, in order to actually render the cubemap on WOWCube, we should split the source image into 24 fragments 240x240 pixels each. And then simply put them on right screens!
The example
First of all, let's declare an array to store all images so that we could access them by index, and load them. The array should have 24 elements.
The ON_Init callback will be the following:
The rendering part of the example is rather simple as well. All we need to do is to figure out a couple of basic things to render required image on the screen:
-
iterate through the screens of a facelet
-
find the place of a facelet
-
draw an image with right rotation angle to make it be aligned properly
public ON_Render() { new facelet[TOPOLOGY_FACELET] = [0, 0]; new place[TOPOLOGY_PLACE]; facelet.module = SELF_ID;
Cube MappingPAWNWrapped for easier reading. Turn wrap off to inspect exact line lengths.}
As a result, we will have our cubemap image mapped to all faces of the cube.